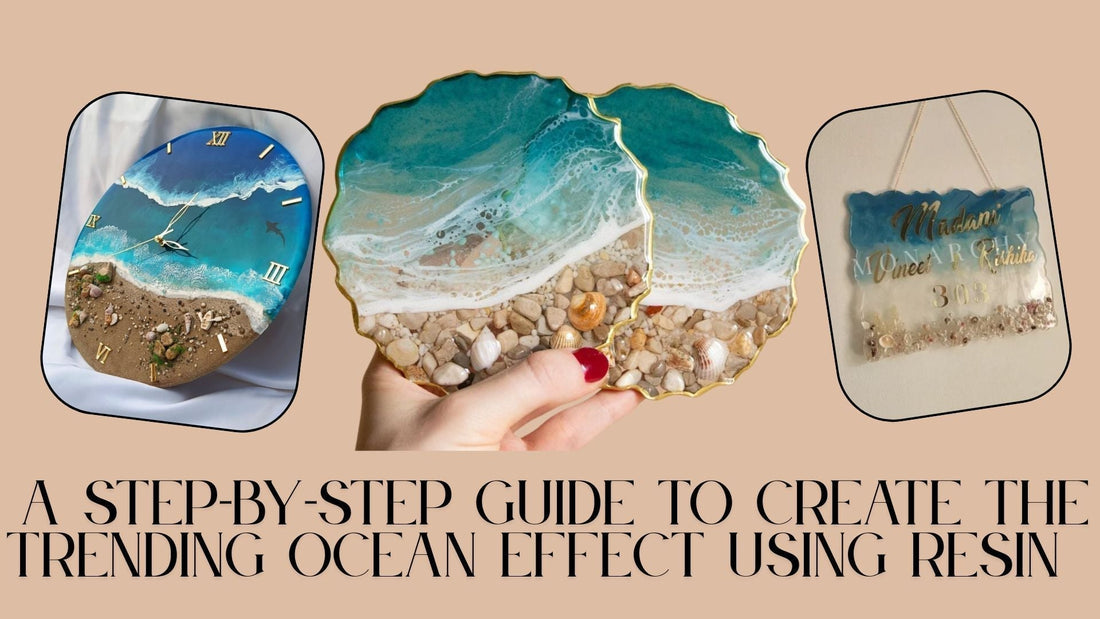
A Step-by-step Guide on Creating Ocean Effect with Resin
Creating a realistic and picturesque ocean scene with resin is challenging but not impossible. Even as a beginner, if you’re ready to embrace the process with patience and a keen sense of curiosity, the results can be rewarding.
Here's a step-by-step tutorial on how to create a realistic ocean effect for any of your resin projects.
Requirements –
1. Epoxy Art Resin & Hardener Combo
Oytra Epoxy Art Resin & Hardener Combo has a 2:1 ratio, auto-bubble-release properties and assures a glossy, durable and non-yellowing end product.
Alternatively, you can also use
2. Silicone Mould
If you’re looking to create a tiny ocean showpiece that adorns your work desk or bedside, Oytra’s 4-inch circular coaster mould will be ideal.
For a larger eye-grabbing creation, something like a wall piece, you can go for Oytra’s 5.5 x 7.5 inches rectangular nameplate mould.
3. Pigment/Mica Powder – White & Blue
If you're a regular resin artist, you can purchase Oytra's cost-effective Set of 6:
10 ml bottles of 6 vibrant pigments
6 varied shades of Mica Powder.
4. Cell Serum for Lacing Effect
Oytra’s Cell Serum for Lacing Effect Resin Art (25 g) - Just 2 drops into the fully mixed resin + hardener + pigments mixture, and swirl/swipe to produce the perfect lacing effect.

Get Oytra's quality-assured art supplies delivered to your doorstep – available on our Official website, Amazon, Meesho, and Blinkit!
(While visual guides are provided at the end for easy reference, it's highly recommended to read through the full blog first for additional tips, techniques, and suggestions.)
Stage 1: Mixing

Choose Your Shades: Depending on your project's size, choose either one or two varying shades of blue for your ocean waters. For small projects (e.g., a palm-sized coaster mould), one shade may suffice, while larger projects can benefit from two shades.
Prepare the Mixtures: Mix the resin and hardener according to the recommended ratio.
Create the following portions:
1. One portion for each shade of blue you've chosen (one or two shades)
2. A portion mixed with white pigment and a few drops of cell serum.
3. One plain and unpigmented portion if it's a small coaster project; if a large project, you can mix art sand into this resin for a realistic beach look.
Colouring options:
Option 1: Deep and Solid Blue (Using Liquid Pigments) – For a deep, rich blue colour, use liquid pigments. This will give your artwork a solid, opaque look, perfect for depicting the depths of the ocean.
Option 2: Glistening Ocean Waters (Using Mica Powder) – For a shimmering, glistening effect, use mica powder. This will add a shiny, reflective quality to your artwork, giving it a dynamic and lively appearance.
Mix each combination for 3-4 minutes to ensure the powder or pigment blends well.
Stage 2: Pouring.
Arrange the seashells and the tiny rocks at the bottom along the border of the mould. Pour the plain, unpigmented resin solution over it.
Pour the blue-coloured resin mixture above, entirely covering the remaining space in the mould.
Next, pour a small amount of white resin along the line where the blue meets the plain resin. Do this carefully to avoid overflowing into the blue area. Add just enough quantity of resin for a subtle transition.
Use a hair dryer over the mould to let the different sections of resin spread across and gently run into each other- this gives a realistic effect.
Stage 3: Curing and demoulding!
Let it sit aside for 24-48 hours for full curing. Demould.
Here are a few quick visual guides on creating the resin ocean effect:
Coasters –
Idea✨: Recreate the ocean design as seen in this video for a custom resin clock! Find our beginner-friendly clock-making kit here.
Serving tray –
Earrings –
Idea✨: Try crafting an ocean-themed bookmark following the same steps! Here's Oytra's Set of 5 Bookmark Moulds.
Surf through the Art Resin blogs section on Oytra's official website as well as our YouTube Channel for more tutorials.